

A beginner's guide to OBS Studio
When it comes to the earth of live streaming, at that place is no software more than flexible and powerful than OBS Studio. It tin can power a huge corporeality of sources, effects, and filters in a solo packet while also keeping resources downwards to a minimum, with a completely flexible set of options to adjust your stream or recording to how yous wish.
The beauty of OBS Studio is besides in its expandability, with a huge number of possibilities via plug-ins that tin can add value in both the client itself and for integration with other services, such as TouchPortal for use with a stream deck using your mobile.
While the software has a steeper learning curve than the two competing streaming packages in Streamlabs OBS and Twitch Studio, it doesn't need to be. While the setup tin look daunting to a coincidental PC user, the interface is not also dissimilar from that used past Streamlabs to use.
Allow's look at how you tin can master OBS Studio and set-up a high-quality stream. Make sure that y'all are always launching OBS Studio as Ambassador to ensure that your figurer is allocating enough resources for it to run smoothly.
The primary screen
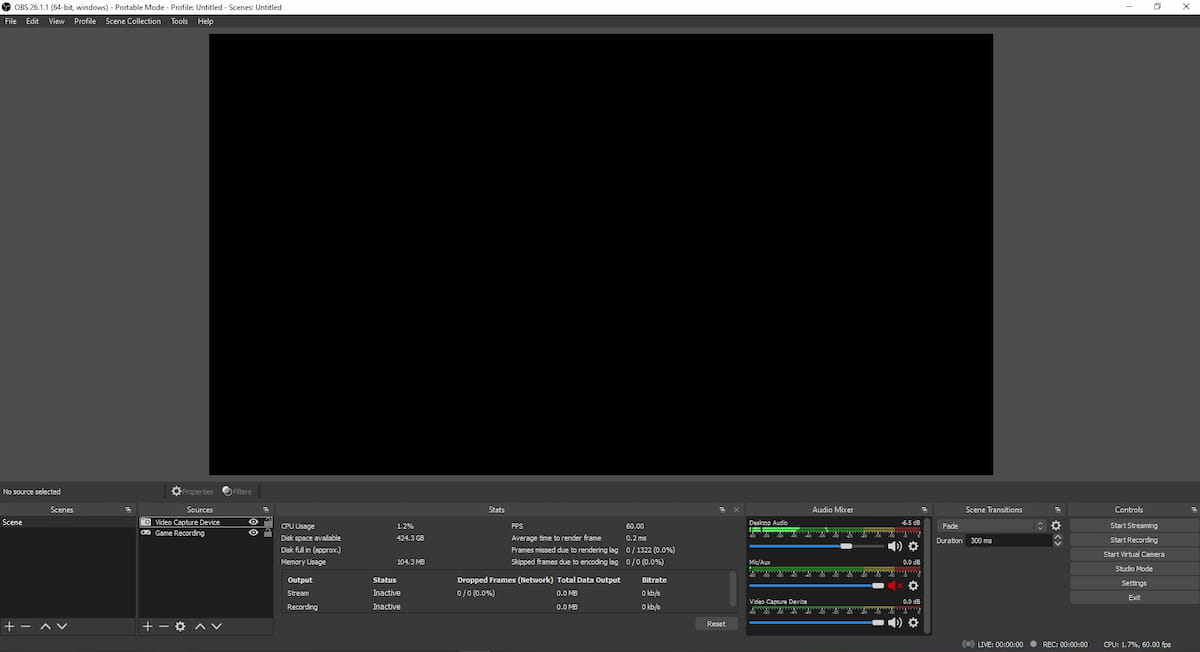
When you kickoff launch the software, the first thing that you volition see is the large black box in the middle of the awarding. This is accompanied by several boxes at the bottom of the screen with headings. The large box is the preview, which shows you what OBS will capture when you start recording or streaming. Afterwards yous brainstorm to add elements to this, the preview will prove you them and what they look like on the screen.
The smaller boxes at the lesser accompanied by headlines, such as 'Scenes' and 'Audio Mixer,' are called Docks, sections that present OBS elements that you can utilize for customization and analytics. The docks and what they practise will be explained after.
Along with these, you volition see tabs at the top that can exist used to access certain features, configure the client and your video output using the settings, and save or back-up your profile or your Scene Collection. Some of the plug-ins that you lot can install will also accept an options tab at the top.
Much like Streamlabs OBS, this is the screen that will go familiar to you very quickly. All of your streaming and recording will exist done from this screen, with the preview interim as a window to exactly what information technology is that y'all're recording, and the docks giving you the immediate controls that stop and start your production.
OBS Docks
At the bottom of your OBS Studio client volition exist areas that you either add, remove or adjust things. These pocket-sized boxes with elements that y'all can add are Docks, and they are labeled to offer information on what they do. You tin can encounter what docks are active and choose which ones you run into past going to View, Docks, and checking the 1 you lot want to see.
They can be moved to almost anywhere on the application past clicking and dragging the dock heading, then letting go in the place you want it to be.
Typically, the iii main docks that OBS will start with are Scenes, Sources, and Audio Mixer, and they volition be the ones you will use the about.
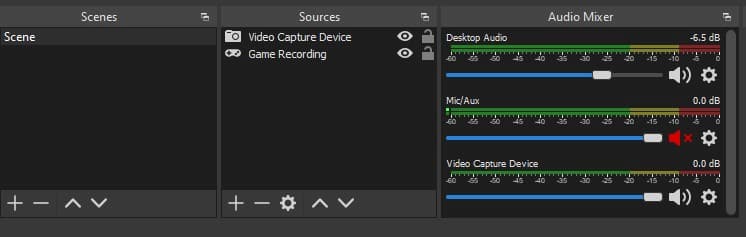
Scenes are a collection of sources together on screen, and y'all can alternating betwixt. An easy way to draw this would exist during a live music operation, where a alter of "scene" typically means switching to a new camera bending or cutting to the presenters. This works similarly on streaming or recording, where yous can change scenes to show something new.
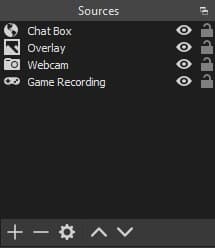
Sources are any elements that are shown on screen. This can be your camera, your gameplay, graphics and overlays, even images and media files that play over each other in a layered limerick.
This means that the sources at the top of the list are the ones in the foreground of your screen and are shown on top of the sources below it. The sources yous see are direct part of the scene you currently accept selected, so if you fix one scene up and then create a blank new i, afterward switching to it, you will notice that the Sources dock is now empty.
Audio mixer is, as you would expect, a mixer for whatever sound entering your computer via a microphone or audio that is existence output by your estimator. You tin can decide how loud or quiet you desire each audio aspect to play through. Information technology's not currently possible to divide the audio on a per-application ground in OBS, so you will need to manage the sound levels on each application individually.
The other three docks bachelor include:
- Controls – Buttons that allow you to commencement your stream or a recording, trigger the virtual camera where you lot tin can use OBS as a virtual camera for other applications, and admission your settings. Studio Mode is also included to help yous make transitions by showing you lot the current scene and the scene y'all want to transition to side-by-side, great if you lot are controlling a stream for someone else.
- Stats – Provides information on the power usage of the stream. This includes the current FPS for the stream, rendering time for graphics on the screen, and other useful information that tin can assistance to manage the technical side of OBS.
- Scene Transitions – This acts equally the setting for global transitions in your stream, meaning that any time you lot switch from one scene to another, this volition be what the transition looks like. For case, if yous have this set to Fade, you will see the scenes fade from one to the other when y'all switch them.
More docks are added when using sure plug-ins, but the vi mentioned in a higher place are those built-in.
Settings
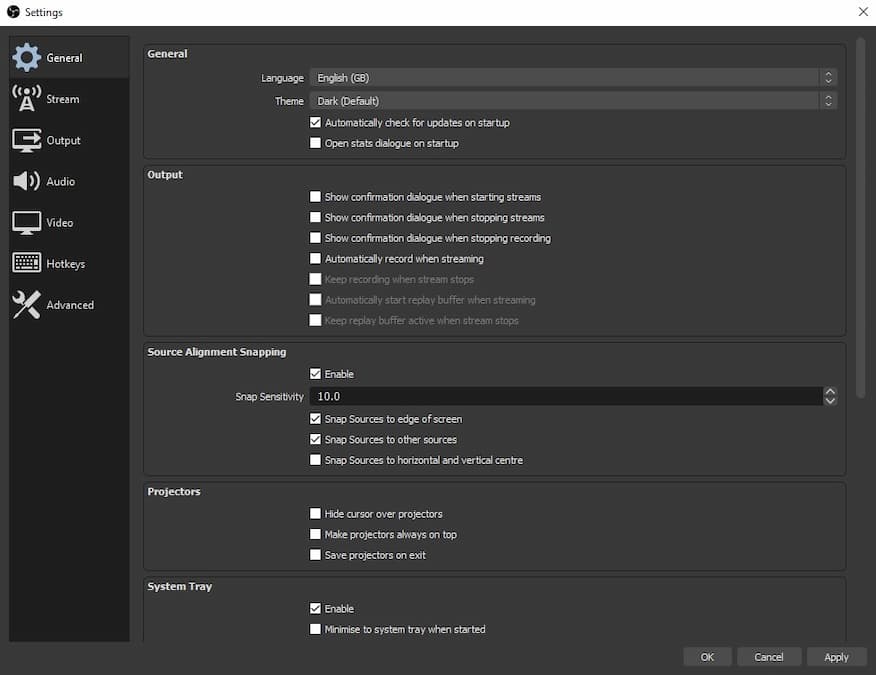
For configuring your OBS to allow for optimal streaming or recording, you lot can control everything in the settings, accessed by going to the top bar, File, and so Settings. This can also be institute in the Control Dock, which starts at the bottom right of OBS.
All of the tabs will control and dictate how you lot want your stream to show on screen, though some tin affect how much power your estimator uses to proceed OBS running smoothly. The settings options include:
- General – Covers most of the full general settings when using OBS, including language settings.
- Stream – Pick which platform you lot are looking to stream from, oft using a stream key from your chosen platform.
- Output – The main settings for determining the quality of the video that you volition output, with separate options for streaming and recording. Includes settings to determine which audio track you want the audio to be output to.
- Sound – Irresolute audio settings for OBS, including the sample rate of the audio that OBS produces back to y'all, or adjusting the number of sound channels if you are using a environs system.
- Video – Your canvas size by resolution that yous want your stream to exist, and the resolution that outputs to a recording or stream. The output frames per 2nd tin besides be adapted based on your feed, with the most popular frame rates supported up to 60 frames per second.
- Hotkeys – This allows y'all to assign keys on your keyboard to control about anything, including switching to scenes and hiding sources. Multiple keys tin be used to trigger something (east.1000., you tin agree shift and press a button to accept a two-button hotkey.).
- Advanced – Admission to more advanced settings such as changing the video rendering engine, changing the process prioritization on your figurer, or calculation a delay. Unless troubleshooting is required, you lot can usually leave these settings alone without effect.
Related: How to notice your Twitch stream key
Each section has many options that can help to customize how your stream or recording will look in terms of quality and size. If you decide to introduce plugins to OBS Studio to aggrandize upon its functionality, some of them contain their ain gear up of tools and options to suit relating to that plugin'southward part. However, exist wary that there could exist some overlap between the settings of those plugins with the global OBS settings.
Setting up to go live
Depending on what you want to practice with OBS, whether it be recording gameplay for content on other platforms or streaming live to Twitch and Youtube, yous will need to set up your OBS for what y'all want to exercise.
Scenes
Typically for recording gameplay, you will only need a single scene with the sources you need for recording. For streaming, however, you may want more than one to help with managing the stream. It'south typical of professional person streams to take scenes to permit your viewers know what the state of affairs is. For example, you may want a screen to prove that you're about to go live, allowing y'all time to do any necessary preparations for your stream away from OBS, such as posting to your social media.
For a basic stream set-upwards, iv or five scenes are typical. This is includes:
- Starting Scene – A scene to let the viewers know that you are most to go alive. Yous can also use the Studio mode to make whatsoever additional adjustments to your other scenes while this Starting Scene is showing alive.
- Just Chatting – In reference to Twitch'southward most-watched category, this is a screen with just the streamer on camera to innovate the stream or talk to viewers, sometimes with a graphical overlay to requite viewers details on their socials or stream updates. If y'all don't employ a photographic camera, this may non be required.
- Gaming screen – This is the main screen for your activeness. It will oft include a camera that has been reduced in size with the game that yous are playing in focus. If you are a non-gaming streamer, this may not be required.
- Be Right Back – If you don't want to leave your audience with a bare camera screen or a game's pause menu, a screen to confirm that you are away from your stream for a moment will assure viewers that yous will be back momentarily.
- Stream Ending – At the finish of a stream, this tells your audition, and anyone that enters your stream late, that yous are finishing. If you feel it's more suitable to end on i of the other scenes, this may non be required.
To add together a new scene, click on the + symbol at the bottom of the Scenes dock, and it will prompt you to give it a proper name. If y'all need to rename this in the future, yous can right-click on a scene and use Rename to alter this.
Sources
For each scene, the Sources dock will confirm what sources yous have included. They work on a layering organisation, significant the source at the pinnacle will be in the foreground of your preview. You lot will desire to ensure that this is in the lodge that allows your viewers to run across everything that yous want on screen.
To add a source, click on the + symbols at the bottom of the Sources dock, and a menu with several different source types will be shown. Each will add a unlike blazon of source to that detail scene, and each time you get add a new i, a carte will ask if you want to add an existing source within OBS or a brand new one. The types of sources available include:
- Audio Input Capture – For an sound device you lot input to the estimator, such equally a microphone from your headset or webcam microphone. This will typically be whichever device is registered on Windows, macOS, or Linux every bit your default input device.
- Audio Output Capture – Audio coming from a source within your computer'south settings for output. This volition typically be whichever device is registered on Windows, macOS, or Linux as your default output device.
- Browser – A source that is set from a browser. This is typically for more advanced functions, but information technology can allow you to show useful streaming things such equally your Twitch chatbox on screen.
- Color Source – A solid color of your option that you lot tin can alter the resolution of to fit your canvass.
- Display Capture – This will capture the entirety of one of your displays rather than a specific plan. If y'all want to show your whole screen, this will do information technology.
- Game Capture – Grabs whatsoever fullscreen application that it can find as a source, only you lot can modify this to selection up a specific game source if yous wish. The game volition demand to be running to see it in the specific window options list.
- Image – Attach an paradigm from your computer to this source, and it will display the epitome in OBS. Beware that it needs the correct path to find the file, so if yous move the image, yous will demand to relocate the file in the OBS Source.
- Image Slideshow – Similar to Image, simply with a choice of images with change over fourth dimension.
- Media Source – Video files, added similarly to image files, can be added equally a source and played on screen.
- Scene – add together in an entire scene from your Scenes department as a source.
- Text – If you want to take text on your preview, this will add together it, with font backdrop adjustable to your preferences.
- VLC Video Source – This will take a source running through open-source media player VLC and incorporate it into OBS.
- Video Capture Device – Devices that capture y'all on videos, such as a photographic camera attached to your figurer or a USB webcam, are added with this source.
- Window Capture – Select the window of a currently open application, and information technology brings that window into OBS.
Once yous accept incorporated it into OBS, yous tin motion it around your preview and resize it at your leisure. When you're happy with the position, you tin click on the unlocked padlock icon next to the source in the dock, and it will show it now locked in identify. Y'all tin also plough it off and on past pressing the middle icon.
Audio Mixer
The sound mixer volition show y'all how the audio levels are looking that OBS is processing. Typically, audio will sound good and make clean in most instances as long as the volume gauges, which yous will come across when you have sound active on your PC, as long every bit information technology says within the green bars. If it goes past these into yellow and red, it typically ways that it'southward coming through too loud and could distort.
If this is the case, you tin simply move the bar side by side to the audio levels down from full until it equalizes the sound to no college than the yellow department. This should keep your audio in clean order and will as well stop your microphone from distorting.
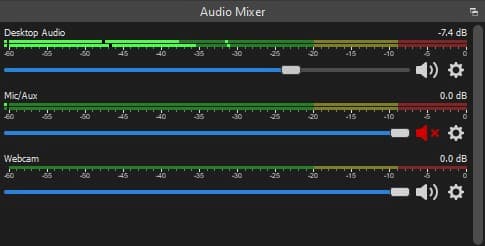
The best manner to see if the audio levels audio good yourself is to take a recording of your sound and mind dorsum. What yous hear is typically what an audience would hear during a live stream. You lot tin can likewise toggle the bars to be vertical or horizontal by correct-clicking within the Audio Mixer deck, and pressing the selection to switch it to the opposite orientation.
If you desire to mute an audio source, but click on the speaker icon to arrive go ruby-red, which will cause it to exist muted.
Get set up to go
Finally, when yous're gear up to brand a start on your recording, the Controls dock will requite you the easy access buttons to either start a recording or begin your stream. Make sure that you are on the scene in your preview that yous want to brainstorm with.
You lot tin begin recording at whatever time, and information technology will save by default to your Videos binder in your main documents, but if you desire to stream, ensure that you have entered a stream key into the Stream section of the settings. If you don't, it will only bring upwardly an mistake message.
Otherwise, you lot'll begin streaming to Twitch and be gear up to face the earth in OBS Studio.
For more advanced tips and troubleshooting with OBS, you can check our ultimate guide to streaming on Twitch, including how to get the most out of OBS Studio.

Source: https://www.gamepur.com/guides/beginners-guide-to-obs-studio
Posted by: jonesjusy1993.blogspot.com
0 Response to "A beginner's guide to OBS Studio"
Post a Comment